The following describes how to configure Mozilla to work with the Tidymail system.
Please note that any red rings indicate areas of specific interest in the given window, they will not be present when you run the program.
Starting from Scratch
First, open Mozilla.
You should be presented with a screen that resembles the following
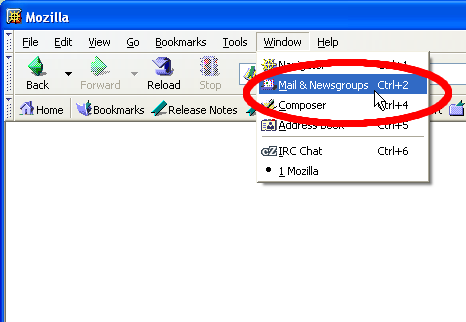
From the Window menu select the Mail & Newsgroups option.
Ensure Email account is selected.
Select Next
Enter the human name you will be using, e.g. John Smith.
Enter the email address you will be using, e.g. john@scootmail.com.
Select Next
Ensure the POP3 option is selected (this is the default).
Enter imap.tidymail.co.uk for the Incoming Server option.
Enter post.tidymail.co.uk for the Outgoing Server option.
Select Next
Enter your full email address, eg john@scootmail.com, for the Incoming User Name option.
Enter your full email address, eg john@scootmail.com, for the Outgoing User Name option.
Select Next
Ensure the Account Name is something you’d like the account to be known as.
Select Next
Ensure Download messages now is not selected.
Select Finish
This concludes the first part of setting up Mozilla to work with Tidymail.
At this point you should be able to receive email, and if you have a Wizards internet connection you may be able to send email. But to get the best from this server you need to make some adjustments to your account which will allow you to send from anywhere, and to encrypt the connections from your computer to our servers.
Tidymail and Mozilla
The following describes how to configure Mozilla to work with the Tidymail system.
Please note that any red rings indicate areas of specific interest in the given window, they will not be present when you run the program.
Starting from Scratch
First, open Mozilla.
You should be presented with a screen that resembles the following
This concludes the first part of setting up Mozilla to work with Tidymail.
At this point you should be able to receive email, and if you have a Wizards internet connection you may be able to send email. But to get the best from this server you need to make some adjustments to your account which will allow you to send from anywhere, and to encrypt the connections from your computer to our servers.
So, come along to the next page and read about Securing Your Connections To Tidymail in Mozilla